In the past, every position within your organization followed a single, uniform set of stages to define the hiring process. This approach posed challenges in managing positions with varying processes. To illustrate, it was equivalent to trying to fit a square peg into a series of holes: some holes were square, while others were round; the stages were suitable for certain positions, but not for all.
What are Workflows?
Workflows consist of a series of stages that outline the process for positions. Workflows enable you to have the capability to develop multiple processes depending on your positions' needs. To use the previous analogy, Workflows enable the square peg to adapt its shape to fit any hole, ensuring a streamlined process for all positions. Additionally, you can incorporate automations into workflows at various stages.
Why should I use Workflows?
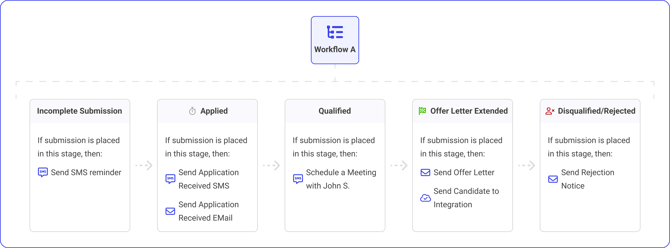
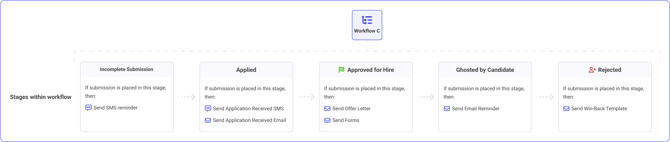
Certain positions within your organization may require two or more interviews, others might need just one, and some may not require any at all. You can now efficiently design Workflows to establish these processes. Based on the previously mentioned example, you would need to develop three distinct Workflows:
Example Workflow A:
Example Workflow B:

Example Workflow C:
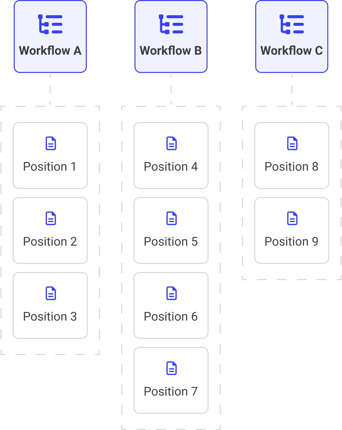
Every Workflow establishes a distinct process. After defining each process, you can assign these Workflows to various positions within your organization.
Workflows provide the flexibility needed in your hiring process for all positions, eliminating the need to fit a square peg into every hole.
How Do I Create a Workflow?
Creating a Workflow takes three steps:
- Configure stages within the Workflow
- Configure which users have access to the Workflow
- Configure automations
1. Configuring Stages within a Workflow
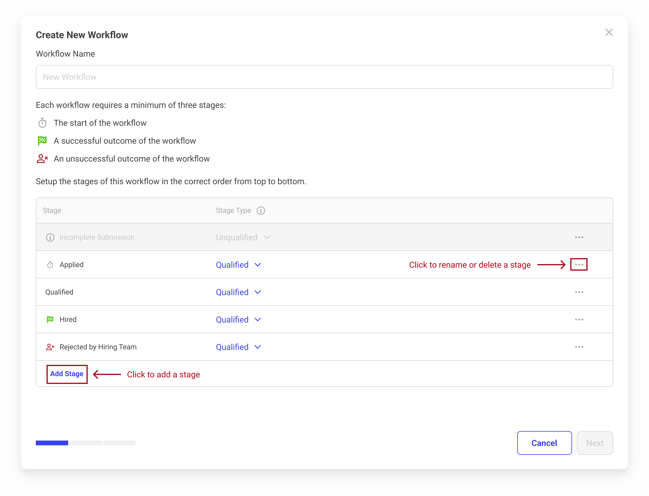
First, you must define how many steps are in the process. When creating a new Workflow, by default there are five stages:
- Incomplete Submission*
- Applied*
- Qualified
- Hired*
- Rejected by Hiring Team*
Although there are five default stages, a Workflow must include at least four hiring stages. The stages marked with an asterisk (*) are mandatory. While you can rename these stages, they are essential for reporting and cannot be deleted.
Icons are displayed next to the 'Applied', 'Hired', and 'Rejected by Hiring Team' stages. These icons signify the stages where candidate tracking begins and ends within the Workflow. The icons are as follows:

Workflows are capable of accurately monitoring the duration candidates spend completing a workflow, as well as conversion rates and additional metrics. For further information on the types of reports that can be generated, please visit our reporting page.
Adding and Removing Hiring Stages
You can add a stage by clicking the "Add Stage" button at the bottom of the list. To rename or delete a stage from a Workflow, click on the three dot menu to the right of the stage name within the list.
Rearranging Stage Order
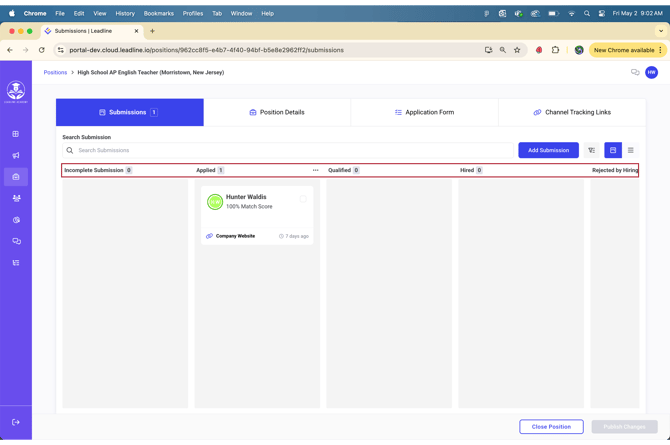
When configuring Workflow stages, the order of the stages matter! To rearrange, click and drag stages. Candidates progress from top to bottom, which also sets the Kanban View order on the Submissions Page.
Click and Drag to Rearrange:
Submissions (Kanban View):
After configuring the number and sequence of stages within the Workflow, the next step is to determine which users will have access to it.
2. Configuring Users with Access to the Workflow
In the past, Company Administrators were required to manually assign users to positions, a method that proved inefficient for hiring teams that frequently adjust roles within their HR department due to seasonal shifts. Workflows facilitate the seamless assignment and removal of users, allowing for effortless role transitions within your HR team, ensuring continuity without disruption.
Assigning Users
If your permissions permit the creation and editing of Workflows, you will automatically have access to all Workflows. Consequently, when creating a new workflow, you will be automatically assigned to it. Additionally, you will see a list of your colleagues within the organization. You can either search and select users individually or use the checkbox at the top left of the 'Name' column header to select all users.
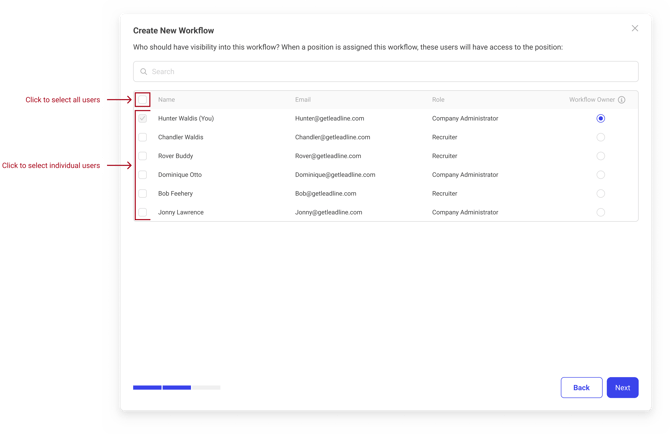
Workflow Owners
For each Workflow you establish, it is essential to designate one Workflow Owner. This individual is granted full access to the Workflow and is generally tasked with managing the entire process. In the event of frequent personnel changes within your HR department, you can swiftly reassign a new Workflow Owner without the need for manual position adjustments. To assign a Workflow Owner, select the radio button located on the right side.
You can only have 1 Workflow Owner per Workflow.
3. Configuring Automations Within a Workflow
Within your Workflows, you can set up automations to streamline tasks such as scheduling meetings, sending emails, and more. To assign an automation, select a stage within the Workflow, then click the dropdown menu to view the available automation options. Currently, there are three types of automations you can utilize:
- Send Email Message to Candidate
- Trigger Message Flow
- Send Candidate to ATS*
The third automation (Send Candidate to ATS) will be unavailable to you if you have no ATS integrations set up within the system. To learn how to set up an integration, click here.
The video below demonstrates how to assign an automated email inviting candidates to schedule interviews with them:
You will notice that each automation has different configuration settings within them.
If an email or SMS automation invites a candidate to an interview, the meeting hosts email signature will be automatically added at the end of the email message.
Send Email Message to Candidate Automation
When setting up automated emails, you can either compose a new email or utilize a pre-existing template from your templates library. Additionally, you have the flexibility to schedule the timing of the email dispatch. If the email includes a Smartline for candidates to arrange a meeting, it is necessary to select a meeting host prior to finalizing the automation. Furthermore, you have the option to include additional participants in the meeting. This automation is ideal for sending reminders, scheduling meetings, sending rejection notices.
When scheduling meetings, candidates will be offered times that are available to the meeting host only; users included in the 'Additional Participants' list will receive meeting invitations but may encounter scheduling conflicts. We are actively developing a solution to ensure that the times presented to candidates will soon be available for all users.
Trigger Message Flow Automation
A message flow is a series of SMS texts that get sent to candidates. Depending on how you set them up, message flows can also trigger specific messages to be sent to candidates based on candidate response logic. These are ideal for sending reminders and scheduling meetings with candidates.
Candidate response logic refers to the system's ability to interpret and react to specific replies from candidates, such as confirming an appointment or selecting an option, within an SMS message flow.
Send Candidate to ATS Integration
If you have an ATS integration connected, you can automatically sync candidates into your ATS when they reach a desired stage in your process. To learn how to set up an integration, click here.
To prevent the creation of duplicate candidates or profiles in your ATS, only a single stage within the workflow initiates an ATS sync. For optimal results, we advise associating the ATS integration sync with the stage that results in a successful outcome.
How do I assign a Workflow to a Position?
After you have configured your Workflow, its time to assign them to your positions. There are a few ways to do this:
- Within the position settings tab within a position
- Via bulk select from the positions page
- Using the "Set as Default" for any new position created
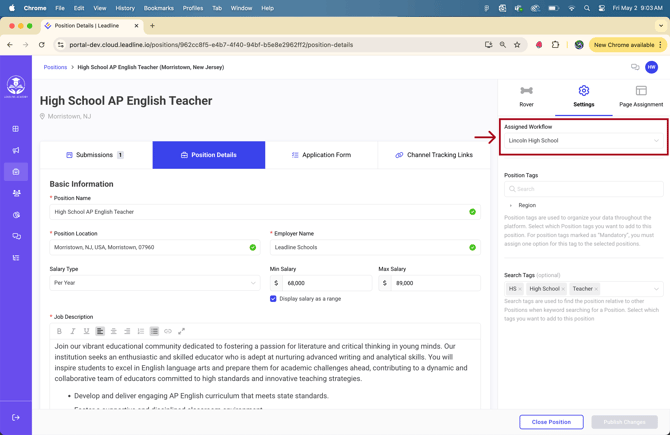
Assigning a Workflow from the Position Settings Tab
The most direct method to assign Workflows to positions is directly within the position itself. Access the position, choose position details, and you will find a dropdown menu within the position settings tab. From this menu, you can select a new Workflow to apply to the position.
Workflows can be altered within positions at any time; however, it is necessary to map submissions to the stages of the new Workflow you wish to implement. Additional details are available at the bottom of this page.
Assigning a Workflow to Multiple Positions using the Bulk Select Action in the Positions Page
You can also assign a Workflow to multiple positions at once via the bulk select actions. To accomplish this, navigate to the Positions page, select the positions you wish to assign the new workflow to and click the "Assign Workflow" button.
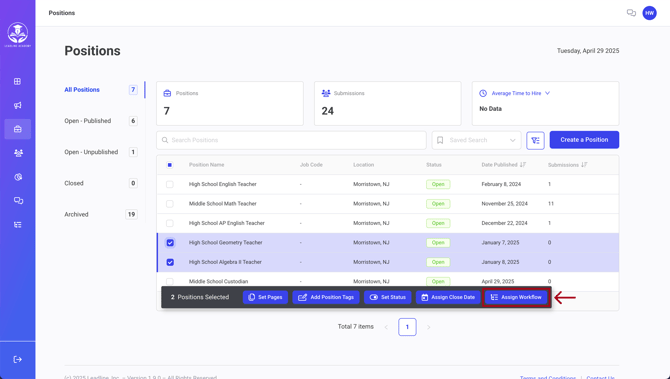
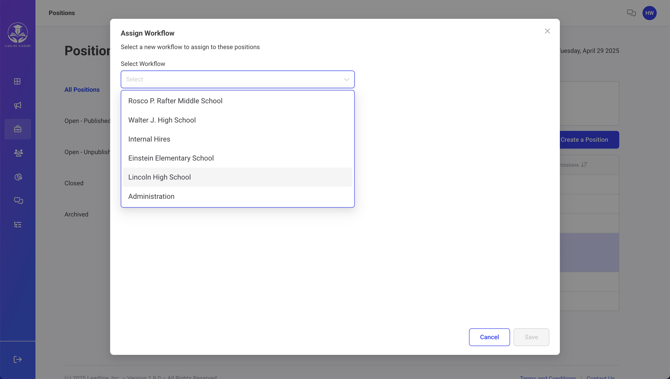
After clicking the button, you will be prompted with a dropdown to select a Workflow to assign to the selected positions.
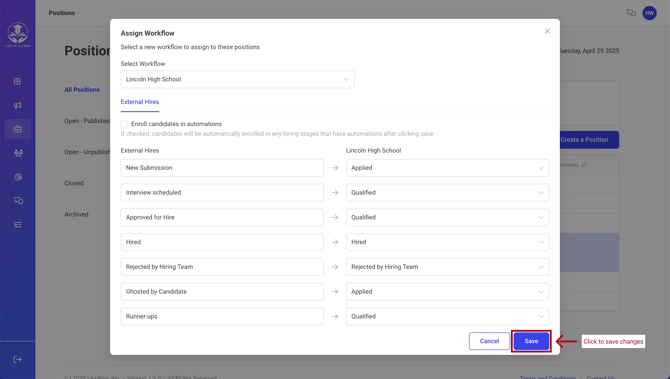
After selecting a new Workflow, you will then be prompted to migrate submissions from the previous workflow into the new workflow. To avoid data loss, it is required to reassign all submissions from the prior Workflow to the new stages in the newly selected Workflow before saving.
You will notice there is a checkbox labeled "enroll candidates in automations". By default it will be unchecked. If you want candidates to be enrolled in the automations within the new workflow, then you must check the box before saving.
 After successfully mapping which stages will be migrated from the old Workflow to the new one, click save and the new Workflow will be assigned to the positions.
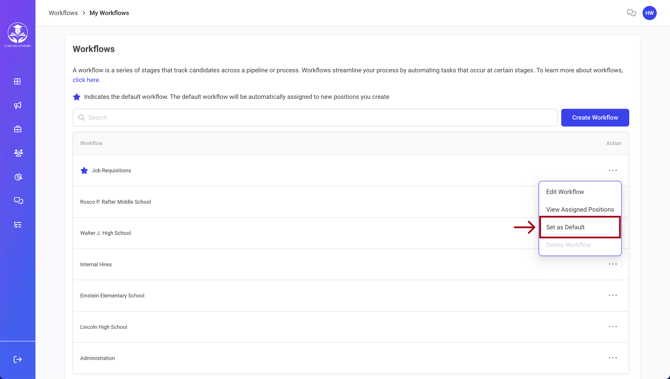
Setting a Default Workflow
To streamline the position creation process, you can designate a Default Workflow. This Default Workflow will be automatically applied to any new positions you establish. To designate a Default Workflow, click the three dot menu in the Workflows Page and select "Set as Default"
When you create a new position by duplicating an existing one, the Workflow associated with the original position will be automatically applied to the new position.