⏱️ Estimated task time: 15 minutes
Welcome to Leadline! This article is intended for first-time users setting up their Leadline account out of the box at a very basic level.
To get started, you can log-in at portal.leadline.io (you might want to bookmark this page!)
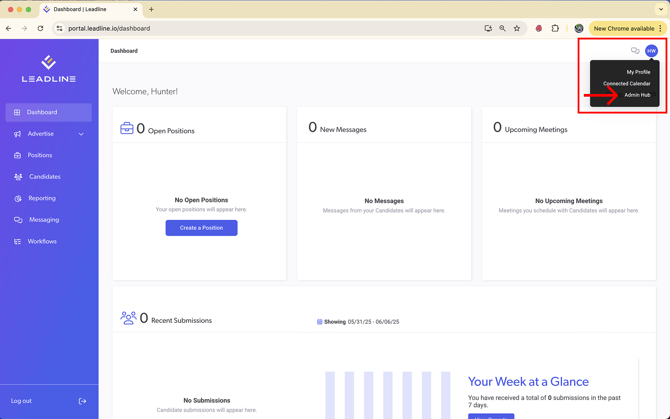
As a Company Administrator, your user role allows you to configure certain settings in your account. You can access all of those settings in the admin hub which can be found by clicking the avatar in the upper-right corner of the screen.
What is the Admin Hub?
The admin hub is where you will be managing every facet of your recruiting team. Company Administrators are the only types of users that have access to this page on the platform. This article will focus on the essentials to get you up and running. If you would like a full overview of our admin hub, visit our admin hub knowledge hub article for more.
Upload a Company logo
First, let's upload a logo for your company. Your Company Logo is displayed to candidates when they apply to a job, so make sure it properly represents your brand.
If you don't have a company logo on-hand, try using your profile image from one of your company's social media accounts (Facebook, LinkedIn, X).
To start, navigate to the Company Information tab and click the icon in the box or the 'Upload' button to begin
🌟 Bonus Task: Configure the navigation bar color, navigation text color and primary color within the platform. These changes will reflect across all users' interface for a more personalized experience! You can use the color picker to sample colors from your uploaded logo/icons!
Setting up your Position Tags
In the admin hub, navigate to the Position Tags tab on the lefthand side. Here, you can create Position Tags to label or categorize your positions. There are two primary use cases for Position Tags:
- Reporting. When you apply tags to a position, you get more custom filters & reporting views in Leadline's reporting module (more on that later).
- Workflow rules. When you apply tags to a position, the system can orchestrate high-volumes of tasks for you. For example, if job status = 'internal only', don't include the job in a paid job campaign to Indeed.
To give you an idea of how to use these, here are some common examples for Position tags:
| Position Tag Display Name | Selection Options |
| Internal status | Internal, External |
| Department (Enterprise organizations) | Sales, Marketing, Finance, DevOps |
| School (K-12 organizations) | ABC Elementary, XYZ Middle School, DEF High School |
| Law Enforcement (Public Sector organizations) | Civilian, Sworn |
| Type | New position, Backfill |
| Sponsorship | Sponsored (Paid Ad), Not Sponsored |
Every company will have its own unique reporting requirements, so take time to think up-front about what position tags are important to measure and operate your recruiting process more effectively.
✅ Task: Create a Position Tag
Setting Up Workflows
As an applicant tracking system, Workflows are a set of hiring stages used to track where each candidate is at within your hiring process for a set of positions:

As a Company Administrator, you have the ability to develop and modify workflows, tailoring the stages within them to align with the specific requirements of your recruiting team. Workflows also control who has access to which positions and which automations you want to trigger at each stage as candidates progress through the workflow.
✅ Task: Navigate to the Workflows Tab in the Admin Hub.
What is the Default Workflow?
The Default Workflow is a pre-set Workflow that is automatically applied to any newly created position within your organization. Leadline offers a standard default workflow that you can tailor to your needs. If you have several workflows, you can change the default workflow whenever necessary. However, only one default workflow can be active at any given time.
✅ Task: Configure the Default Workflow
You will notice the stages within the default workflow are:
- Incomplete Submission
- Applied
- Qualified
- Hired
- Rejected by Hiring Team
Imagine these stages as a linear process; Candidates will progress from stage 1 to stage 5 over a period of time which we call the Candidate Lifecycle. The Candidate Lifecycle is the amount of time a candidate spends getting screened and qualified from the moment they first apply to a position to the moment they are either hired or rejected. You will notice icons in the workflow signifying when tracking begins and when tracking ends. These are essential for reporting purposes.

For now, we recommend configuring the stages in your process to get started and to worry about automations later.
IMPORTANT: Icons are displayed next to the Applied, Hired, and Rejected by Hiring Team stages. These icons signify the beginning and conclusion of the Candidate Lifecycle. It is advisable to position the Applied stage immediately following the Incomplete Submission stage and to place the Hired/Rejected by Hiring Team stages at the very end of the workflow.
Note: Leadline is capable of recording when a candidate initiates an application but does not complete it. As we can still gather their details, this information is retained in the Incomplete Submission stage. Candidates in this stage are not yet considered to have entered the candidate lifecycle. This stage is purposefully included to facilitate re-engagement with candidates, encouraging them to complete their applications and formally commence the process.
To get started, configure the amount of steps you think would be best to outline one of your current process' and name them accordingly. It doesn't have to be perfect, our Customer Success Team is here to help! Just reach out to them at any time for help with this step. The video below demonstrates creating a process for hiring supervisors within a school district.
For a full breakdown of Workflows and how to create automations and edit user permissions, visit our workflows knowledge hub article.
About Qualified & Unqualified Stage Types
Candidates that are engaged with your hiring team are considered Qualified Candidates. Having a good amount of active candidates is an indicator of your recruiting team's operational success (the more qualified candidates, the higher the chances of converting a hire). Set a Hiring Stage as active to count candidates placed in this stage. Some examples of active hiring stages:
- Phone screening
- Interviewing
- Pending Approval
- Offer Letter / Submitted
Candidates that are not engaged with your hiring team are considered Unqualified Candidates. While a high-volume of unqualified candidates is common, they are useful when it comes to monitoring job board performance: if your recruiting team ends up putting 95% of candidates from job board X into an inactive hiring stage, that's an indicator that the job board is not delivering quality candidates into your hiring pipeline. Set a Hiring Stage as inactive to count candidates placed in this stage. Some examples of inactive hiring stages:
- Disqualified
- Rejected by Hiring Manager
- Ghosted by Candidate
[Optional] Connect your domain for Branded Email
When you send emails to candidates, you may notice by default the sender address comes from a no-reply@leadline.io email address. When it comes to creating a superior candidate experience that showcases your brand, you can use Leadline's Branded Email feature to send emails from a no-reply@yourDomain.com email address.
To setup Branded Email, you need a Domain/IT administrator who is able to add DNS records to your domain. This secure authentication mechanism, known as DKIM, authorizes the Leadline application to send emails on behalf of your domain.
To setup Branded Email:
- Navigate to the 'Branded Emails' tab within the Admin Hub
- Click ‘Add Domain’.
- Enter your domain name (eg. getleadline.com). This will create a domain in the ‘pending’ state.
- Select the ‘. . .’ options and click ‘View DNS verification records’
- From your 3rd party DNS settings console, create CNAME records using the values displayed in Leadline. You can use the copy to clipboard button to easily copy each name/value and paste these values when creating CNAME records.
- Wait for the domain to verify (this may take up to 1 hour depending on your DNS settings).
- Once verified, you will see the domain listed as 'Verified' in Leadline
- Select the ' . . . ' menu and select 'Set as sending domain'. Once set, emails should start sending using the new domain.
- If you want, you can configure the sender settings to customize what "outbox" you want to use. By default, it is "no-reply", but you can make this something like "recruiting@yourCompany.com" or maybe "hr-team@yourCompany.com"
Heads up: Leadline's email feature is a 1-way outbox. If a candidate tries to reply to an email sent through this feature, they will receive a failure message.
The video below is an example of setting up a custom domain, as well as how to read the DNS Settings: